Safe Mode is a diagnostic mode of a computer operating system, such as Windows 10 or the newly released Windows 11. It provides a way to troubleshoot and solve problems that might prevent the normal operation of your computer.
This guide will provide a thorough examination of how to access Safe Mode, including methods through BIOS, key combinations, the command prompt, and even how to boot into Safe Mode without logging in or from a power off state. We will also cover the specific process to start a Dell laptop in Safe Mode on Windows 10.
Understanding Safe Mode
Safe Mode only loads the minimum drivers and services that Windows absolutely needs, making it a useful tool to diagnose and resolve system-related issues.
For instance, if a program or driver prevents your system from running properly, Safe Mode can help you fix it without the conflicting software getting in the way.
Accessing Safe Mode in Windows 10 and Windows 11
There are several ways to access Safe Mode in both Windows 10 and Windows 11, including:
- From BIOS: Restart your computer and press the appropriate key (usually F2, F8, F12, Del, or Esc) to enter BIOS. Use the arrow keys to select the ‘Boot’ tab, then ‘Safe Boot’, and finally ‘Minimal’. Press ‘Enter’, then ‘F10’ to save and exit.
- Using Key Combinations: Press the ‘Windows’ key + ‘R’ to open the ‘Run’ dialog box. Type ‘msconfig’ and press ‘Enter’. In the ‘System Configuration’ window, click on the ‘Boot’ tab, check the ‘Safe boot’ box, and finally click ‘OK’. Restart your computer.
- From Command Prompt: Press the ‘Windows’ key + ‘X’ and choose ‘Command Prompt (Admin)’. Type ‘bcdedit /set {default} safeboot minimal’ and press ‘Enter’. Reboot your computer.
How to Boot into Safe Mode without Login or from Power Off
If you cannot log into your computer or if it is powered off, you can still access Safe Mode:
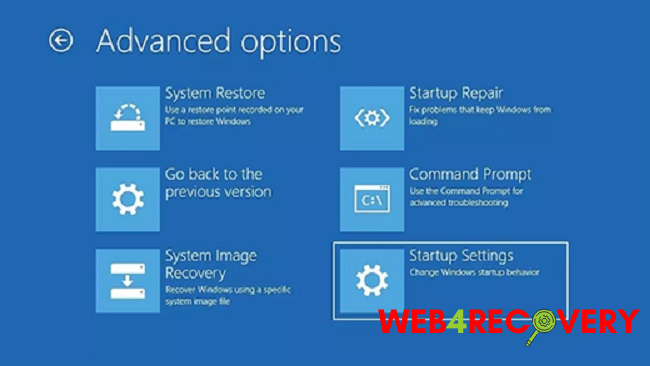
- Without Login: On the login screen, select ‘Restart’ while holding down the ‘Shift’ key. Your computer will restart into the ‘Choose an Option’ screen. Here, go to ‘Troubleshoot’ > ‘Advanced options’ > ‘Startup Settings’ > ‘Restart’. After your computer restarts, choose ‘Safe Mode’ from the list.
- From Power Off: Turn on your computer and as soon as the Windows logo appears, hold down the power button until the PC shuts down. Repeat this process two more times. On the third start, Windows should enter the ‘Automatic Repair’ mode. From there, go to ‘Troubleshoot’ > ‘Advanced options’ > ‘Startup Settings’ > ‘Restart’. Then, select ‘Safe Mode’ from the list.
Starting a Dell Laptop in Safe Mode on Windows 10
For Dell laptops, the process is slightly different:
- Restart your Dell laptop and as soon as the Dell logo appears, press the ‘F8’ key multiple times until you see the ‘Advanced Boot Options’ menu.
- Use the arrow keys to highlight ‘Safe Mode’ or ‘Safe Mode with Networking’ (if you need internet access).
- Press ‘Enter’ to boot into Safe Mode.
Conclusion
Safe Mode is a powerful tool for troubleshooting a variety of issues with your Windows operating system. Whether you’re using Windows 10 or Windows 11, a Dell laptop or another brand, understanding how to access Safe Mode can save you a lot of time and frustration.


 Error")


