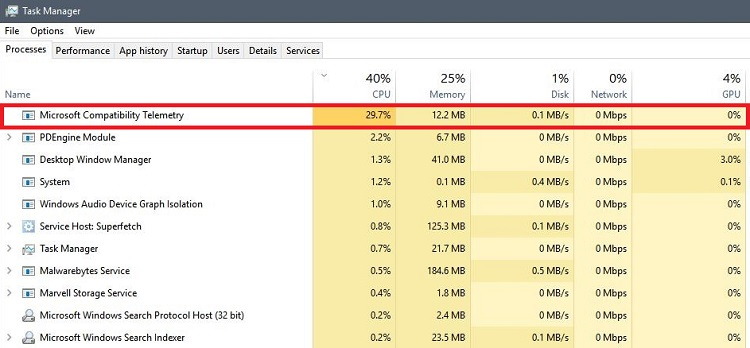
Microsoft Compatibility Telemetry High CPU and Disk Usage: Microsoft Compatibility Telemetry is a built-in service that comes in Windows 10 and its function is contain data about following:
- How windows devices and its related software devices are working.
- To send the data periodically to Microsoft to enhance the user experience by fixing the potential issues that may occur.
The Telemetry data or the technical data that Microsoft Telemetry service contains includes metrics diagnostic information, logs of applications that we use on a frequent manner, system files, index of media files, transcripts of words you say, typed text and etc.
However, along with the benefits of this Microsoft Telemetry service comes inconvenience also, and that inconvenient users face is Microsoft Compatibility Telemetry Windows 10 High Disk Usage. The Telemetry service sometimes uses 50% of the disk usage and thus, makes the computer working slow and annoying
If you are also facing this issue then don’t worry because in this article, we are going to share the methods that you can use to fix Microsoft Compatibility Telemetry High CPU and Disk Usage issue. Let us begin.
How to Fix Microsoft Telemetry High Disk Usage
Method 1 – Update Device Drivers
Now, you can update your device drivers by two ways either manually or you can choose automatically update the driver method.
You can update the device drivers manually using Driver Easy, this will help you to find right drivers for your device by automatically recognizing your system. You can try this method using following steps:
Step 1: First of all, you should download and install Driver Easy software.
Step 2: After successfully installing Driver Easy software, open it and select Scan Now option to detect possible problems.
Step 3: Then, select Update button situated next to your Driver to automatically download and install the driver.
Step 4: To update all the versions of your Driver select Update All button and then reboot your PC.
Step 5: Next, open Task Manager, you can press “Ctrl + Alt + Esc” key combination and then check the usage of Microsoft Telemetry Service in there.
Method 2: Disable Microsoft Compatibility Telemetry through CMD
To try this method, follow the steps give below:
Step 1: Open Run Dialog Box, you can do it by pressing Windows + R Key combination and then type cmd in the run dialog box and hit enter button.
Step 2: Then choose Run as Administrator option from the search results.
Step 3: In the new window that opens Press Ctrl + Shift + Enter at the same time.
Step 4: Then, copy and paste the following command: SC DELETE DIAGTRACK SC DELETE DMWAPPUSHSERVICE ECHO “” >C:\\PROGRAMDATA\\MICROSOFT\\DIAGNOSIS\\ETLLOGS\\AUTOLOGGER\\AUTOLOGGER-DIAGTRACK-LISTENER.ETL REG ADD “HKLM\\SOFTWARE\\POLICIES\\MICROSOFT\\WINDOWS\\DATACOLLECTION”/V ALLOWTELEMTERY /TREG_DWORD /D 0 /F
Method 3: Use Registry Editor.
To try this method, follow the steps given below:
Step 1: First of all, open Run Dialog Box using Windows + R Key combination and in the dialog box type regedit and hit enter button.
Step 2: Next, click on Yes button when the User Account Control appears and then go as per the following path:
HKEY_LOCAL_MACHINE>>SOFTWARE>>Policies>>Microsoft>>Windows>>DataCollection
Step 3: After that, right-click on the Data Collection >> select New>>DWORD (32-bit value).
Step 4: Next, you will be redirected to anew window, then double click on Allow Telemetry after giving a name to new value allow telemetry.
Step 5: At last, in the box that appears on screen set the value to ZERO (0) and hit the OK button.
Method 4 – Use Group Policy Editor to Disable it
To try this method, follow the steps given below:
Step 1: Open Run Command Press Windows + R Key Combination and then type “gpedit.msc” & hit enter button.
Step 2: Afterwards you will need to go as per the following path:
Computer Configuration>>Administrative Templates>>Windows Components>>Data Collection and Preview Builds.
Step 3: In the Data collection and Preview Builds folder, Double-Click on Allow Telemetry.
Step 4: Then, in the next window that opens Choose Disabled > Click Apply and then hit OK button.
Step 5: Next, press Ctrl + Alt + Esc key combination it will open the Task Manager and then check if the Microsoft Compatibility Telemetry High CPU and Disk Usage error is resolved or not.
Method 5 – Clear the Running Memory to Speed Up System
You can use a tool to Clear your System’s memory and to try this method you can follow the steps given below:
Step 1: Open the tool in your computer and then select Cleanup and Optimization option in it.
Step 2: Next, select Junk file Cleanup option followed by Analyze option and this find out any trash in your computer.
Step 3: At last, check & select all the trash that you would want to be Removed or Cleared From Your System > Select Cleanup.
Step 4: Afterwards, wait for some time until the cleaning process is done and then check if the error is solved or not.
Method 6: Using Diagnostic Tracking Service
To try this method, follow the steps given below:
Step 1: At first, Open the Search Menu and then type services in the search box.
Step 2: From the options that appear choose Services (Desktop App).
Step 3: Next, from the list of services will appear from that Search & Select Diagnostic Tracking Service.
Step 4: In the Diagnostic tracking service window search and open its properties.
Step 5: Once you are into its properties window Go to General Tab > Select Disable under startup type.
Method 7: Remove it from the Task Scheduler
So, this is the resort to resolve this Microsoft Telemetry High Disk Usage problem. You can try this method using the following steps. We are using this method because generally the processes in the Task manager have a set time and sometimes, they keep on executing even after their work is done consuming disk.
Thus, the following steps will help you perform this method:
Step 1: At first, Press Windows + R Key Combination this will take you to Run Application.
Step 2: Then in the Run Dialog Box type “taskschd.msc” and then hit the enter button.
Step 3: When the task scheduler window opens up then you navigate to the following path:
Task Schedule Library > Microsoft > Windows > Application Experience.
Step 4: Then, you will be redirected to a new window with some entries and at the top of those listed entries, you will see a task named Microsoft Compatibility Appraiser (CompatTelRunner.exe).
Step 5: Right-click on the above-mentioned task and from the pop-up menu Select Disable Option.
Step 6: At last, restart your PC and do check if the Microsoft Compatibility Telemetry High CPU and Disk Usage error is solved or not.
Conclusion
So, these were the most efficient and used methods that can help you in resolving Microsoft Compatibility Telemetry High Disk Usage problem in your PC. In case, one method doesn’t work for your PC, you can switch to the next method because not every method works on every computer.
Always remember to follow each of the method strictly as mentioned in the article to save your PC from further issues. If the Microsoft Compatibility Telemetry High CPU and Disk Usage issue still persists even after using all the possible methods then don’t worry you can always head to service center and get your issues resolved by the professionals.
I hope these methods works for you.


 Error")


