If your memory card/ micro SD card is write-protected, any operation you wish to perform will be rejected. For instance, if your SD Card is write protected, you cannot write any data to it, delete files from it and also cannot format it. Hence, the SD Card becomes useless.
In this article, you will see a list of all possible methods to Remove Write Protection from Micro SD/Memory Card and to format the memory card so that it works in a normal operating mode.

Micro SD cards, those tiny storage devices we often use in smartphones, tablets, and cameras, sometimes throw a curveball by becoming ‘write-protected.’ This means you cannot modify its contents, be it deleting, copying, or saving new files.
In this article, we’ll dive deep into what write protection on Micro SD cards means, what causes it, and how to rectify the situation.
What is Write Protection on Micro SD?
Write protection, often known as “read-only mode,” is a security feature that prevents unauthorized users from modifying the content of your Micro SD card.
When activated, it ensures that the data on the card cannot be altered or deleted, thus safeguarding sensitive data from being tampered with or unintentionally erased.
What Causes Write Protection on Micro SD Error?
Several factors can trigger write protection:
- Physical Lock: Some Micro SD cards come with a small physical switch on their side that can toggle write protection. If this switch is set to the ‘locked’ position, it can enable write protection.
- Software Errors: Software or formatting errors can lead to write protection. For instance, if the card is improperly formatted or if there’s an error during a data transfer process, the card might automatically turn on write protection to prevent data loss.
- Viruses or Malware: Malicious software might lock your Micro SD card to prevent access to important data.
- Storage Issues: If the card is full or close to its storage limit, it might show a write protection error.
- Corruption: Over time, with regular wear and tear, Micro SD cards can get corrupted. When this happens, the card might go into write protection mode to prevent further damage.
1. Using Formatting Tools for Removing Write Protection
SDFormatter v4
For formatting, a memory card which is write protected, make use of SDFormatter. Also, it helps you to remove write protection from the SD card. It helps in fixing the file reading and writing errors. Try Quick or Full (Overwrite) Formatting of the memory card to unblock it.
HP Disk Format Tool
For removing the write protection, you can make use of the HP Disk Format Tool. So, go to the Settings and select the file system and format type. At last, force format your SD Card.
HDD Low-Level Format
HDD Low-Level Format performs in the same way as the tools described above. It helps in Formatting of HDD, SD, MMC, MemoryStick and CompactFlash memory devices.
2. Using Registry for Removing the Write Protection
Make sure to keep a backup copy of Windows Registry before performing this method because if Registry is mishandled then Operating System will get disrupted.
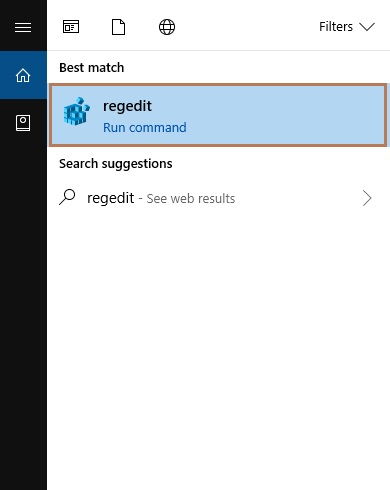
Step 1: At first, click on the Start and type regedit in the search box. Now, open Registry Editor as an administrator.
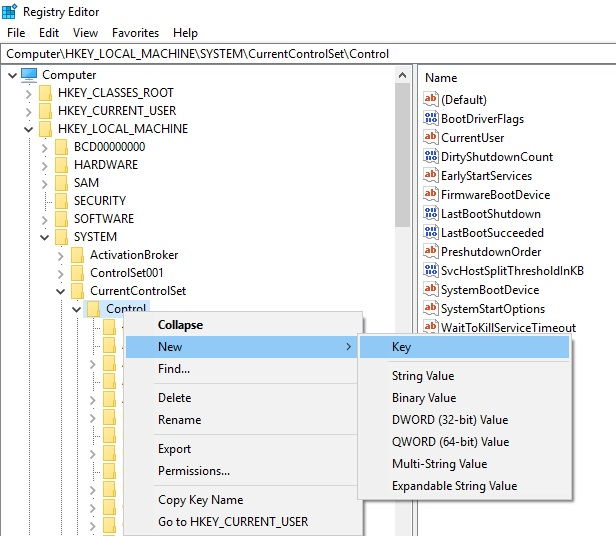
Step 2: Open the folders one by one according to the sequence: HKEY_LOCAL_MACHINE-> SYSTEM-> CurrentControlSet-> Control. Then look for folder StorageDevicePolicies. If this folder doesn’t exist, then you have to create it.
- Right click on folder Control.
- Then, select New and Key. Give it a name StorageDevicePolicies.
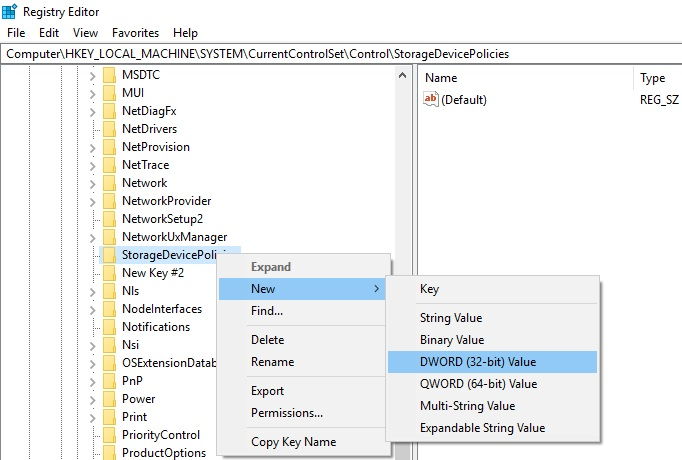
Step 3: Now, right click on the folder StorageDevicePolicies. After that, click on the new value of parameter DWORD for 32-bit OS or QWORD for 64-bit OS.
Step 4: Change the name of DWORD/ QWORD to WriteProtect and double click on the line changing its value to 0.
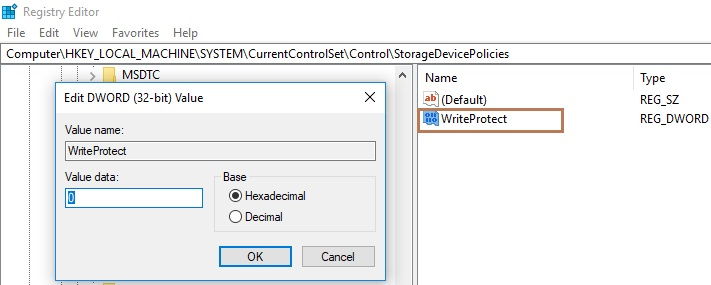
Step 5: At last, remove your memory card and reboot your system.
3. Using Diskpart For Removing The Write Protection
Diskpart is a utility that helps in managing disk partitions and volumes at a low level of access. It helps you to remove “read-only” protection and to unlock the memory card. Follow the below steps to achieve this:
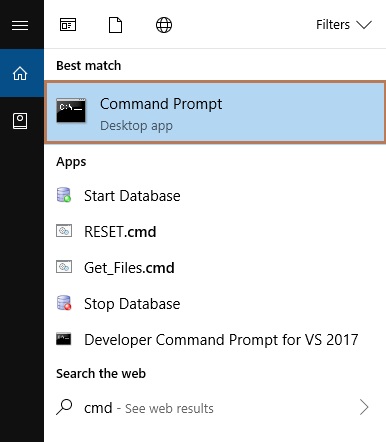
Step 1: At first, click on the Start and type cmd search box. Now, click on the Command Prompt.
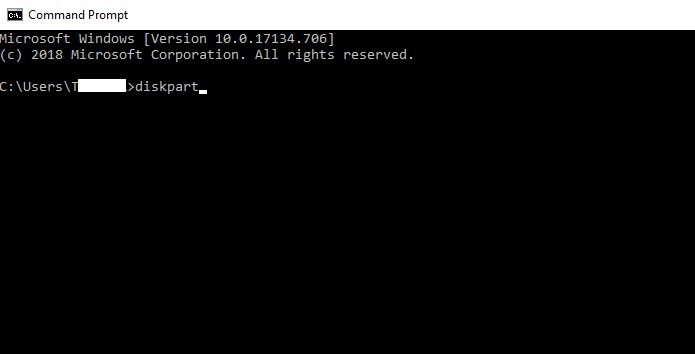
Step 2: In cmd, type “diskpart.”
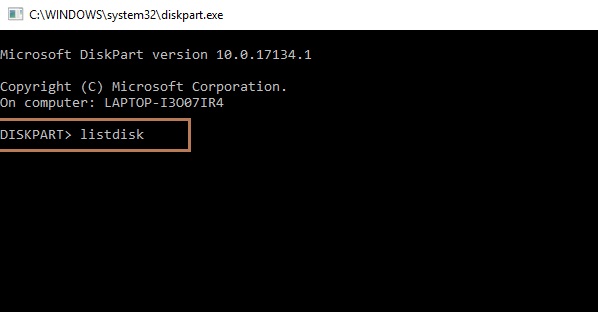
Step 3: After that, type “list disk” which will display all the disks available in the system.
Step 4: Search for your USB flash drive in the list. Now, type “SELECT DISK n” where n is the memory card which has to write protected partition.
Step 5: Now, type the command “clean.” Sometimes, you may have to enter this two or three times.
Step 6: Then, for creating a new partition on a memory card, type “create partition primary.”
Step 7: For activating the disk, type “active.”
Step 8: At last, type “format fs=ntfs” for formatting to NTFS.
4. Using diskmgmt.msc Utility For Fixing SD Card
The method described below helps remove the write protection from both SD Cards and USB sticks.
Step 1: At first, press the Windows+R key together from your keyboard to invoke the Run box. Then, type diskmgmt.msc in the dialog box. Click on Ok button. 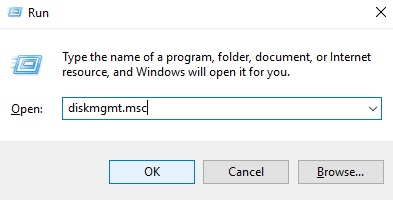
Step 2: Go to the context menu of the partition that needs to be partitioned.
Step 3: Then, click on “Delete Volume” and after that confirm it.
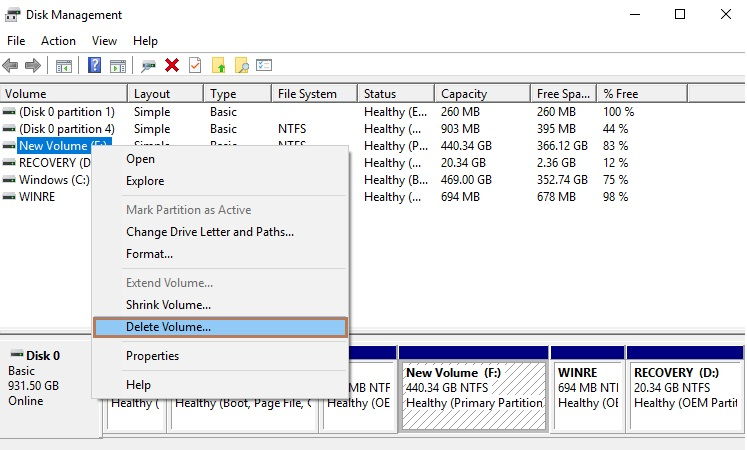
Step 4: In the context menu, select the option “New Volume.”
Step 5: Then, select a primary partition.
Step 6: Don’t change the default parameters.
5. Using GPEdit for Disabling Write Protection
Sometimes, access to an SD Card is restricted by Windows Local Group Policy. Follow the below method to remove the “read-only” restriction:
Step 1: At first, press the Windows+R key together from your keyboard to invoke the Run box. Then, type gpedit.msc in the dialog box. Click on Ok button.
Step 2: Follow the sequence: Computer Configuration-> Administrative Template-> System-> Removable Storage Access.
Step 3: At last, disable the parameter “Removable Disks: Deny All Access.”
6. Using Modern Digital Cameras for Formatting
According to users’ reviews, many Canon and Nikon camera models helps to format on a low level. For fixing the SD Card using a camera, follow the below steps:
Step 1: At first, insert your SD card into your device.
Step 2: Then, look for formatting command in the camera menu.
Step 3: At last, Write files onto the formatted card.
7. Using HDDScan for Checking for Bad Blocks
HDDScan helps in checking the memory cards and flash drives for bad blocks and read errors. For finding an issue test your sd card by performing two types of tests: Read and Write tests.
It will take only around 5 minutes, and after completion, you will receive a report depicting any bad sectors preventing your flash drive from proper operation.
Now you can select any of the two scenarios for solving the problem:
- If your flash drive is new, then you can replace it on a warranty.
- If there is no warranty, fill the bad sectors with zeros. You can do this with the help of DMDE program. It helps in removing the bad blocks.
8. Using “Clip” for Removing the Write Protection
A clip is a device which helps in removing a forgotten or automatically set password. In other words, it allows you to remove hardware interlock from SD/ SDHC/ microSD cards. After a card is detected in the slot, full formatting command is given which remove the card flash memory and command boxes.
The built-in led displays the result: if flashing is fast it means success, and if there is slow flashing it means failure, i.e., card is corrupted. Wait for few seconds and after that, your card is just like the new one. In some cases (like the corrupted firmware) the clip is of no use.
In any mobile repair service, you can find a clip. Also, it’s the cost is low at around $14.99.
9. Contacting the Technical Support Staff
For fixing the corrupted flash drives for free you can contact Technical support staff, they will provide you suggestions. Also, technical support staff also offers special programs for low-level formatting.
10. Taking help of Professionals
Take the advice of professionals if you are willing to pay money for fixing your problem. It may be expensive, but you get benefits such as extracting data from a device which is corrupted.
11. Another Ways of Removing Write Protection
After trying all the above methods if still, you are not able to remove the write protection, do follow the below instructions:
- Do scanning of your SD Card for viruses because malware apps take control over your files and won’t allow you to overwrite them. Make use of effective online antivirus.
- Try upgrading your SD Card firmware.
- Toggling the write protect switch of your SD Card to enable access.
How to Unlock a Write-Protected SD Card?
- Physical Unlock: The simplest method is to check the physical switch on the side of the Micro SD card. Ensure it’s set to the ‘unlocked’ position.
- Using Diskpart on Windows:
- Connect the Micro SD card to a Windows PC.
- Open Command Prompt as an administrator.
- Type “diskpart” and hit Enter.
- Type “list disk” to show all the disks. Identify your Micro SD card from the list.
- Type “select disk X” (replace X with the number of your Micro SD card).
- Type “attributes disk clear readonly” and hit Enter.
- Once the process is complete, type “exit” to leave Diskpart.
- Formatting: If none of the above methods work, you might need to format the Micro SD card. However, this will erase all data on the card. Before doing this, try to back up any important data using specialized software. Once backed up, you can format the card using a PC or device.
Final Words
So, these are 11 ways that can help you to Remove Write Protection on Micro SD Card or Memory Card. Here, I want to advise you that f you are not aware of PC and all this stuff. Then you should use method 10. It is always good to take the help of professionals. It simply saves your time and money.
Write protection, though essential for security, can sometimes become a hindrance. By understanding its root causes and the methods to unlock the protection, users can ensure the seamless usage of their Micro SD cards. Always remember to handle storage devices with care and to maintain regular backups to prevent data loss.


 Error")


