The ‘Windows Modules Installer Worker‘ issues can be quite bothersome as they result in slow functioning of the computer system. Don’t worry! Here is an article to help you fix the ‘Windows Modules Installer Worker‘ issues in no time.
Firstly, let’s begin by understanding about the ‘Windows Modules Installer Worker‘. The ‘Windows Modules Installer Worker‘ is a Windows update service. It checks for updates while constantly running in the background. It thus consumes a lot of space in your computer system and leads to slowing down respectively.
How to Disable Windows Modules Installer Worker in Windows 10?
You can confirm if the issues are the reason behind the slow speed of your computer system by following the steps given below:
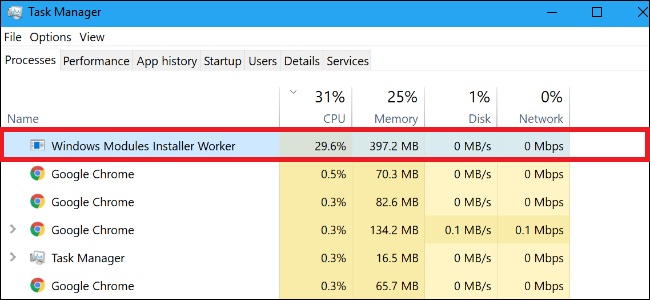
Step 1 – Firstly, press the Ctrl + Shift + Esc keys together to open up the task manager.
Step 2 – Then, Select the ‘Processes‘ tab in the task manager.
Step 3 – Now, scroll down and search for a process named ‘Windows Modules Installer‘.
Look at the information given in front of Windows Modules Installer to check the amount of space occupies by it.
Here are a few quick methods worth trying to solve the ‘Windows Modules Installer worker’ issues.
Method 1: Manual Windows Update
If the process is running automatically in the background, it is bound to keep your computer system slow. Here, switching the Windows module installer service from automatic to manual mode can help you tackle the issues.
Follow the steps given below to switch the Windows module installer to the manual mode:
Step 1 – First of all, press the ‘Windows’ key and ‘R’ together to open the run command dialog box.
Step 2 – Then, type ‘services.msc’ in the run command dialog box and press enter.
Step 3 – The services tab will pop up. Now, navigate to ‘Windows modules installer‘ service.
Step 4 – Then, the Windows modules installer properties will open up. Select ‘Manual‘ startup from the ‘Startup Type‘ option.
Step 5 – Then, click on ‘Stop‘ if the status of the service is ‘Running‘ in the Service Status section.
Step 6 – Now, click on ‘Apply‘ and then ‘OK‘.
Step 7 – Then, navigate to ‘Windows Update‘ service in the service tab.
Step 8 – Then, the Windows update properties will open up. Select ‘Manual‘ startup from the ‘Startup Type’ option.
Step 9 – Then, click on ‘Stop‘ if the status of the service is ‘Running‘ in the Service Status section.
Step 10 – Finally, click on ‘Apply‘ and then ‘OK‘.
Method 2: Troubleshoot
The Windows built-in troubleshooter can help you fix the ‘Windows Modules Installer Worker‘ issues.
Follow the steps given below to run Windows in-built troubleshooter:
Step 1 – First of all, press the ‘Windows‘ key and ‘R‘ together to open the run command dialog box.
Step 2 – Then, type ‘control.exe /name Microsoft.Troubleshooting’ in the run command dialog box and press enter.
Step 3 – The troubleshoot window will open up. Then, select ‘View All‘ option visible on extreme left side of the pane.
Step 4 – Now, click on ‘System Maintenance‘ option.
Step 5 – Then, click on ‘Advanced‘. Make sure that the ‘Apply repairs automatically’ option is checked.
Step 6 – Finally, click ‘Next‘ and wait for the Windows to finish troubleshooting. Also, check for updates once the process is completed.
Windows updates are necessary for your computer system’s security and efficient functioning. Make sure to regularly check for updates after following the above methods.
Conclusion
Hopefully, one of the methods mentioned above were able to fix the Windows Modules Installer Worker issues for you.


 Error")


