The Modern Setup Host runs in the background when your system detects or installs an update. It also plays an important role in running the setup file to upgrade the PC. Window 10 is the latest updated version of the Microsoft Operating system.
Updating to windows 10 from Windows 7, 8 or 8.1 can be completed without any data loss. In case you are using Windows XP or Windows Vista, you will lose data while upgrading to Windows 10.
So, make sure that your motherboard supports a newer operating system and backup your important data to a USB flash disk, network storage or cloud storage.
Now, for the people updating their Windows 7, 8 or 8.1 to Windows 10, there are three methods to carry on with the update.
- Using a Bootable USB or DVD.
- Using Windows Update
- Using Media Creation Tool.
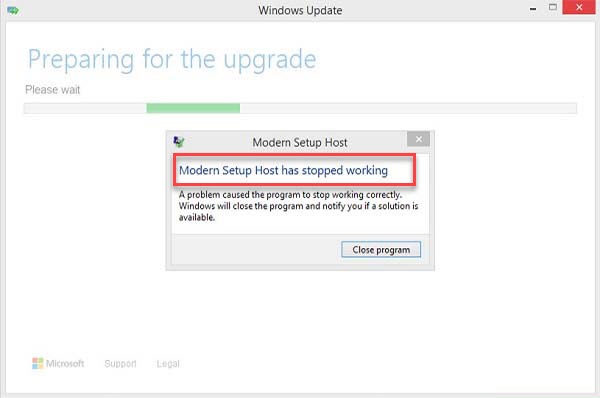
However, few users faced the irritable Modern Setup Host has Stopped Working error while upgrading their respective Windows 7, 8 or 8.1 to Windows 10.
The reason behind the Modern Setup Host has Stopped Working error can be a wrong system configuration, a problem with the upgrade process or other such reason.
Windows, with its myriad of features and functionalities, can sometimes bewilder its users with specific processes and errors that appear out of the blue. One such element that has been a topic of interest for many is the Modern Setup Host.
This article will dive deep into what Modern Setup Host is and elucidate the common problems, especially the notorious “Modern Setup Host Stopped Working” error.
What is Modern Setup Host?
Modern Setup Host, technically known as SetupHost.exe, is an integral component of the Windows operating system. It operates in the background and springs into action whenever you’re upgrading to a newer version of Windows or when installing major updates.
This process ensures that updates and upgrades are implemented smoothly, preserving the integrity and functionality of the system. Typically, it runs silently in the background, and users often don’t notice its activity unless an error arises.
Causes of “Modern Setup Host Stopped Working” Error
The “Modern Setup Host Stopped Working” error can be a hindrance to your system update or upgrade process. Multiple factors can contribute to this error, including:
- Corrupted System Files: Damaged or missing system files can lead to a host of errors, including the Modern Setup Host failure.
- Insufficient Disk Space: Upgrading Windows or installing updates requires a significant amount of free disk space. If the system is running low on space, the process might get interrupted.
- Faulty Windows Update: Sometimes, specific Windows updates might have bugs that cause the Modern Setup Host to stop working.
- Third-party Software Interference: Software, especially those related to security like antiviruses, might interfere with system processes, leading to errors.
- Outdated System Drivers: Obsolete or incompatible drivers can sometimes clash with Windows updates or the upgrade process.
Resolving the Modern Setup Host Error
While the error can be frustrating, various solutions can be employed to tackle it:
- Perform a Clean Boot: A clean boot ensures that minimal drivers and programs are running. This helps in isolating the software or driver causing the interference. To perform a clean boot, use the System Configuration utility (
msconfig). - Use Windows Update Troubleshooter: Windows comes equipped with built-in troubleshooters for numerous issues. Running the Windows Update Troubleshooter can help identify and automatically resolve problems.
- Clear Temporary Files: Over time, temporary files accumulate and might take up crucial space needed for updates. Use the Disk Cleanup tool to clear these files.
- Update Drivers: Ensure all your system drivers, especially the graphics and network drivers, are updated to their latest versions.
- Free Up Disk Space: As mentioned, having sufficient disk space is vital for updates and upgrades. Check your system’s storage and consider transferring files externally or deleting unnecessary ones.
- Disable Antivirus Temporarily: Sometimes, security software can hinder the update process. Consider disabling them temporarily, but ensure you turn them back on afterward.
Methods to Fix Modern Setup Host Has Stopped Working Error
Don’t worry! We have ten quick fixes to help you cater with the irritable Modern Setup Host Has Stopped Working error.
Method 1: Clean Install Window 10
If you are tired of carrying out these troubleshooting steps, you can always try to install Windows 10 again. Make sure that your motherboard, brand name computer or notebook supports Windows 10 and backup all the important data.
Method 2: Run System File Checker
System File Checker (SFC) is a command line utility integrated into Windows that checks for system file corruption. If there are some issues with system file corruption, SFC will fix them. You must be an administrator running a console session in order to use the SFC utility.
The SFC includes additional commands such as ‘SCANNOW’. ‘SCANNOW’ scans all protected system files and repairs the one with problems if possible.
Method 3: Use DISM To Repair Windows
Now, we will need to use a tool named DISM (Deployment Image Servicing and Management) which will allow you to mount Windows image file (install.wim) and do image servicing including installing, uninstalling, configuring and Windows update.
Download it here https://docs.microsoft.com/en-us/windows-hardware/get-started/adk-install .
Method 4: Move User Folder To Default Location
Try moving back your user profile to default location ‘C:\Users\YourUserProfile’ if you moved it to another location previously. Then, run the upgrade.
Method 5: Check Free Hard Drive space
The hard drive needs considerable space to begin the upgrade installation. The Media Creation Toolkit requires around 8 GB for downloading the update in your computer system.
So, make sure to have more than 8 GB of free space in your hard drive for your applications, data, and work.
If your hard drive doesn’t have enough space, delete the unnecessary applications and data or backup a few data to the USB flash disk, external storage, network shared storage or cloud storage (One Drive, Google Drive, and others).
Method 6: Prepare Windows PC/Computer For Upgrade
Making certain system changes is another potential solution for the Modern Setup Host has Stopped Working error. The system changes will include disabling services not related to Microsoft, disabling startup programs and changing regional Windows settings.
Follow the steps given below to make the system changes for Windows 7, Windows 8 and Windows 8.1:
Step 1 – Press the “Windows’ Key and ‘R’ together to open the run command dialogue box.
Step 2 – Then, type ‘msconfig’ in the run command dialogue box and press enter.
Step 3 – The System Configuration will open. Then, choose ‘Services‘.
Step 4 – At the bottom left corner you will find the ‘Hide all Microsoft services‘ option, Click on it.
Step 5 – Then, click on the ‘Disable All‘ option in the bottom right corner.
Step 6 – Finally, click on ‘Apply‘ and then on ‘OK‘.
Once the process is completed all the services not related to windows will be disabled.
Now, follow the steps given below to disable all startup programs:
Step 1 – Press the ‘Windows‘ Key and ‘R‘ together to open the run command dialogue box.
Step 2 – Then, type ‘msconfig’ in the run command dialogue box and press enter.
Step 3 – After that the system Configuration will open. Then, choose startup tab if you are operating on windows 7.
In case you are operating on Windows 8 or 8.1, choose Startup tab and then click on Open Task Manager and choose startup tab again.
Step 4 – Click on “Disable All” at the at the bottom right corner.
Step 5 – Now, click on Apply and then OK.
Step 6 – Finally, Restart your windows and run windows upgrade.
In the end of the process, all the startup programs will be disabled.
Now, follow the steps given below to change regional settings through Control Panel:
For Windows 7
Step 1 – Press the “Windows’ Key and ‘R‘ together to open the run command dialogue box.
Step 2 – Then, type “Control Panel” in the run command dialogue box and press Enter.
Step 3 – Then, choose on the “Clock, Language, and Region” option.
Step 4 – Then, choose the “Location tab”.
Step 5 – Then, click on Current location and choose the United States.
Step 6 – Choose Keyboards and Languages and click on Change keyboards.
Step 7 – Now, choose ‘General tab’ and under ‘Default input language’ choose English (United States).
Step 8 – Then, click on Apply and then OK.
Step 9 – Finally, restart your windows and run windows upgrade.
For Windows 8 and Windows 8.1
Step 1 – Press the “Windows’ Key and “R” together to open the run command dialogue box.
Step 2 – Then, type “Control Panel” in the run command dialogue box and press enter.
Step 3 – Then, choose on the “Clock, Language, and Region” option.
Step 4 – Then, choose the Location tab.
Step 5 – Then, click on Current location and choose the United States.
Step 6 – Then, click on Apply and then OK.
Step 7 – Now, under “Clock, Language, and Region” click “Language” to add another language.
Step 8 – Now, choose “Add a language”. Then, select “English” and click “Open” to choose English (United States).
Step 9 – Then, click on ‘Add’ and under languages select your previous language. Then, choose Remove.
Step 10 – Finally, Restart your windows and run windows upgrade.
If the system changes were unable to solve the error, try the next method.
Method 7: Create Bootable USB And Upgrade Your PC/Computer To Windows 10
Here, you need to upgrade your Windows machine to Windows 10 by using bootable USB flash drive. At first, you will need to create bootable media using the Appuals way for which you will need a program called Rufus. Download it here https://rufus.ie/.
follow the steps given below to create a bootable usb:
Step 1 – First of all, open rufus and choose the Device (USB) which should be used as your bootable media.
Step 2 – Now, choose “GPT Partition” scheme for UEFI and leave the File System & Cluster Size to default settings and make sure to label the drive.
Step 3 – Check “Create A Bootable Disk” and ensure select the ISO Image from the drop down.
Step 4 – Finally, choose “Start.”
Now, you need to reconfigure your BIOS or UEFI for your computer system to boot from the USB flash drive. Follow the steps given below:
Step 1 – After creating the bootable DVD/USB, go to your system’s BIOS by pressing ‘F2’ (Varies From System to System) and select Boot Order.
Step 2 – Then, bring your DVD/USB to the top as a First Boot Device. STEP3- Make sure to save changes to the settings and restart your PC again.
It will automatically boot up using your bootable media and repair your Windows too. After the process is completed boot your Windows machine by using USB and run the upgrade procedure.
Method 8: Run Disk Cleanup And Delete $Windows.~WS folder
To boot the speed of your computer system running a disk cleanup is necessary. Disk Cleanup is a utility integrated into Windows which will help you to remove the unnecessary files from your hard disk and help you boot the speed of your Windows machine.
Follow the steps given below to run disk cleanup and delete the $Windows.~WS folder:
Step 1 – First of all, open the Disk Cleanup utility from the Control Panel and Administrative Tools. Select the “C” Drive or wherever you installed Windows recently.
Step 2 – Then, it will start calculating the files which need to be deleted. Click on the button Clean Up System Files.
Step 3 – The Previous Windows Installation with a great amount of memory space it has occupied will be displayed.
Step 4 – Check this box and press OK. It will ask you for permanent deletion of files, click “Yes”.
Method 9: Run Setupprep.exe to Resume Upgrade
Running setupprep.exe file will resume the last operation instead of starting completely a new. Follow the steps given below to run setuoprep.exe:
Step 1 – First of all, run Windows upgrade through Windows by using Media Creation Toolkit.
Step 2 – Close the Windows Update or Media Creation Tool once the error pops up.
Step 3 – Then, press the ‘Windows’ key and ‘R’ together to open the run command dialogue box.
Step 4 – Type ‘C:\$Windows.~WS\Sources\Windows\sources\setupprep.exe’ in the run command dialogue box and press enter.
Finally, let the windows upgrade to complete.
Conclusion
Hopefully, one of the ten methods mentioned above were able to fix the ‘Modern Setup Host has stopped working’ error. Now, you can freely update your current windows system to the latest version of windows 10.


 Error")


